


Prompting Like a Pro
How to Get the AI to Understand Your Vision


The High-Tech Creative is an independent arts and technology journalism and research venture entirely supported by readers like you. The most important assistance you can provide is to recommend us to your friends and help spread the word. If you enjoy our work however and wish to support it continuing (and expanding) more directly, please click through below.
Welcome to Prompting Like a Pro! In this article we hope to shed some light on the shadowy art of generative prompting, alleviate anxiety and embolden the reader to launch on a journey of exploration of art and image generation.
There is a perception outside of the generative art community that AI Art is simple, a matter of just telling a computer what to do and getting a perfect image in response. There is, of course, a lot more to it than that and a huge range of techniques from inpainting to control-net manipulation, but it does usually start with prompting and despite common belieft prompting is not the simple task it might seem to be.
In the rest of this article: We will start with a very brief overview of some high-level differences between the models that you should keep in mind when applying the information learned from this article and then progress to a set of best practice guidelines for getting the most out of your prompting experiences. This will be followed by a couple of step-by-step examples using the Flux.1 model to show how the process can be applied and we'll finish up with some suggestions for further investigation.
Please note, these suggestions come from both research and trial and error experimentation, primarily with open source models. It is almost certain that this is not the only way to get interesting results out of these models. If your process is significantly different, don't feel slighted! Reach out and let us know. We're always eager to learn new techniques and would gratefully update this article with new information and advice as it is received.
Prompting is as much an art as a craft and it will take time and practice before it becomes natural; and even then you will occasionally struggle to get the output you envisage. Of course, during this process you often come across "happy little accidents" as Bob Ross would have it, and sometimes end up with something better than you had planned. So, feeling patient, brave, and ready to launch into the world of generative art? Then lets go.
How do image models understand us?
Each of the major image generation models uses a slightly different method of interpreting prompts which is part of the reason why a single prompt can be used on multiple models with very different results. Earlier models, such as Stable Diffusion 1.5, relied on early CLIP encoders for understanding prompts and required them to be structured in specific ways using comma-separated keywords and short sentences to structure an image.
Modern models however have mostly moved to a more natural language style of prompting with the latest models getting extremely good at interpretation. Even so there are some principles to keep in mind that will give you the best chance of communicating your intention to the model. The guidelines and suggestions we will cover are generally applicable across the board for major models but there are some slight differences that are worth keeping in mind depending on the model you use. Some of these are listed below:
Stable Diffusion (SDXL, SD3.5):
- These models in general prefer their prompts to be more structured and concise. Natural language still but concise.
- The most important elements should be prioritised at the beginning of the prompt, with less important details towards the end.
- Work best with prompts under 75 tokens in length. (Shorter is better)
Flux.1
- Prefers more natural language descriptions
- Works better with complete natural sentences
- Doesn't require as much structure or conciseness as SDXL/3.5
DALL-E (OpenAI)
- Excels with detailed natural language descriptions
- Can interpret complex scenarios.
- Does not support negative prompting.
Midjourney
- Has a specific command structure and prompt structure unique to itself.
- Limited to around 60 word prompts.
- Uses a unique parameter system
Whilst the basic guidelines here are likely to be useful for designing midjourney prompts, we will not be examining Midjourney and its unique prompting model in any detail in this article. The High-Tech Creative's primary focus is on open-source generative AI for self-hosted creativity and we do not currently have access to Midjourney in order to test or create examples. (If this changes at a later date, there will be an updated version of this article.)
The Art and Craft of Prompt Building
Note: Though laid out in steps below, these are guidelines only. You will not use every step with every prompt, and nor will you necessarily do it in this order depending on how inspiration strikes. Experiment, create, and find out what works for you, don't be afraid to step off the beaten path
Step 1: Subject
It all starts with the subject, the main focus of the image. Understanding what the focus is allows us to hone in on the most important details to guide the model in the direction we want it to go. Without it, the resulting prompt (and thus image) is more likely to meander, be confusing and unfocused. At this stage you should be thinking primarily in terms of nouns, what are the things we want to see. A subject doesn't have to be complex, in fact it might be more useful if it is short and concise at this point.
Examples:
"A majestic lion standing on a rocky hill"
"An ancient astronaut examining strange alien hieroglyphs on a distant planet's surface"
"A sleek cyberpunk cyborg gazing at neon-lit skyscrapers"
Step 2: Style and Influence
Most image models are trained on a huge variety of images including specific artists and art styles which can be used to help guide the overall aesthetic of the image. Though the recognition of specific artists and styles does differ from model to model, I encourage you to try a wide range, it can be surprising just how many the models recognise.
The simplest way to include this in your prompt is either before or after your main subject, like this:
"A hyper-realistic rendering of [subject]"
"[Subject] painted in the style of Van Gogh"
The models understand a wide variety of styles far beyond the usual "Realistic digital painting of" that you see everywhere. Be creative!
Step 3: Descriptive Adjectives
We now start to iterate on the prompt in earnest, adding more details to describe not only what we want to see but what exactly we want it to look like. In particular there are several categories you should look to include in most prompts:
Lighting: Describe how the image is lit and the use of shadows.
Examples: "soft lighting", "golden hour", "dramatic shadows"
Mood: Every model is going to understand moods and emotions differently, and in the open source community finetuning can modify this even further. Showcasing your intent with mood descriptions such as "serene", "mysterious", "tense" can help direct the model in subtle ways towards your artistic goal.
Textures and Colours: Few things add richness to an image like texture and colour and they shouldn't be neglected. This can be extremely detailed, such as using hexcodes to describe specific colours to include, or more general to allow a wider range of creative options to the model.
Examples: "smooth metallic surfaces", "vibrant hues of blue and orange", "bright jewel tones"
Step 4: Context and Background Details
An image consisting of just the subject on a white background is unlikely what you're looking for, so lets add in more detail. Are there other people or animals in the background? What do they look like? What are they doing? What is the landscape like, tall soaring buildings, a fast moving river or an arid desert? With the subject set up as the focus, now we add verisimilitude to the world.
Examples:
"A cozy cabin by a lake, surrounded by snow-covered pine tress under a starry sky".
"A bustling 1920s jazz vlub interior, with dancers swirling beneath glittering chandeliers"
"A fantastical underwater coral reef teeming with colorful fish, an ancient sunken city half submerged."
Step 5: Composition
The difference between a nice image and an amazing work of art can often come down to composition so don't be shy about telling the model how you want the image laid out. You are the director of this piece of artwork after all. Some things to consider:
Framing: Thinking in terms of film directing can help here. Do you want a wide angle shot to establish location? A close-up on the subject, excluding much of the background? A full body shot perhaps, allowing your entire subject in frame? Consider depth, you can describe features in terms of background, middle ground and foreground for instance.
Perspective: Consider the angle and location of the viewer, that imaginary person from whose perspective the image is created. Here filmmaking terminology can help again, maybe you want a low angle shot, where the camera looks up at the subject from beneath to give the subject an aura of strength and power. A bird's eye view shot to show the whole landscape laid out below?
Technical terms: If you are a traditional artist or photographer, or spend the time to learn the terminology of those fields, they can be very useful in describing precisely what you want. For instance, if you ask for a close up bokeh photograph, you are likely to get a photorealistic image of the subject close up with a short depth of field, rendering the background fuzzy and indistinct while the subject remains crystal clear. (A personal favorite style of mine).
Compositional Devices: There are any number of compositional devices, ways of discussing the layout of an image, that have been developed over the years both to guide artists and facilitate discussing art. Using these terms can sometimes help guide the image you want to create as well. A few short examples:
The Rule of Thirds: Imagine a grid that divides an image into nine equal squares. If you place the key elements of the image along these lines or at the intersections it can naturally draw the viewers attention and prevent the image clustering in the center, adding balance and interest to the work. "A portrait composed using the rule of thirds, with subject's gaze diagonally toward top right corner."
Leading Lines: Natural lines within an image can guide the eye towards a focal point or deeper into image space, aiding the impression of depth. "A lone road winding through a lush valley leads to a majestic mountain range in the distance."
Symmetry/Asymmetry: These concepts can be played with to create additional effects in your images. Balanced symmetry feels more formal and tranquil, whilst intentional asymmetry adds tension and a sense of dynamism to the scene. Symmetry: "A perfectly mirror Japanese Zen garden reflecting calmness.", Asymmetry: "A chaotic steam,punk citscape with overlapping cogwheels and angled structures".
Negative Space: The empty places in an image can be as vital and impactful as the elements added to the image themselves, preventing the overall image from descending into meaningless chaos and emphasising the focus of the mage. Consider it's deliberate use in order to evoke the emotion you're looking for. "An astronaut floating in deep space against an expansive black backdrop, highlighting their solitary form."
Step 6: Emotion and Narrative
Expanding on the idea of the "mood" of a painting, you can incorporate both the emotion you want to evoke or depict and direct narration into your descriptions to help guide the model in its creative choices. Experiment with different options and see what subtle differences it makes to the generated image. If the image seems too dark, modify the prompt to specify brighter lighting. If you think a Chi
Examples:
"A deserted amusement park, overgrown with weeds, haunted by nostalgic memories and the lingering joy of laughter long gone"
"Two lovers embracing under a pouring rain in Paris on Valentine's Day - capture the raw passion amidst the romance"
"A lonely astronaut gazing at Earth from a distant asteroid, evoking feelings of isolation and wonder."
Step 7: Iterate
This is likely something you will be doing constantly during your prompt building. It simply means run the prompt! See what image it produces, then make adjustments and try again. Sometimes when you see something you realise it doesn't work as well as you thought it would, or something more is needed. Once you have a good starter prompt, refine it over multiple runs to get it closer to your desired endpoint. If it looks too dark, modify the prompt to include brighter lighting. If the perspective feels all wrong, try some different angle prompts. There are infinite possibilities.
Step 8: Negative Prompts
This is only an option for the open source models for the most part and, honestly, I have had mixed success with it. The theory is that a negative prompts contain things you don't want to see and the model should filter them out as it generates. As you explore the community you can find lots of example negative prompts that various artists have sworn by (many including gems such as "no misshapen body parts, no extra fingers on hands").
The latest models such as Flux.1 state that negative prompts should no longer be required for the best results, but experiment and see how you go.
Step by Step Examples
We'll go through some examples step by step, with images, to show how the process could work. As with any creative art, the only hard and fast rule is please yourself, experiment, deviate, invent, and then share your successes with the rest of us! All of these examples were carried out with Flux.1.
Example 1: Start Simple, then refine
1: "A forest at sunrise."
Simple, to the point, and not particularly interesting. We could get anything from this, so lets take a look how it goes.


Pretty pictures, but we can do better.
2: "A wide angle photograph taken with a 24mm lens of a forest at sunrise."
We've added stylistic information now that should help guide the image. Interestingly we got mostly photorealistic images from the first prompt which suggests the Flux.1 model might default in that direction. There was really no reason it had to though, it could just as easily have provided us with impressionist paintings.


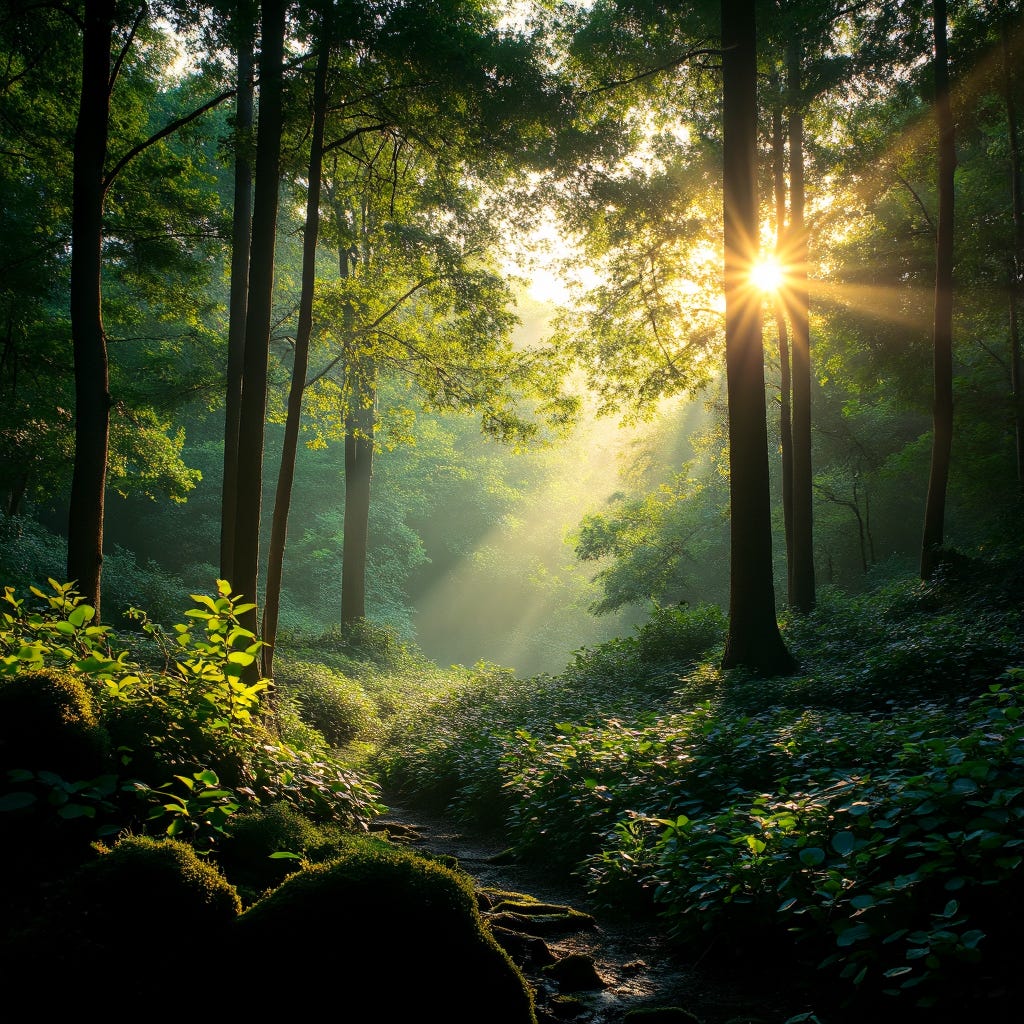
3: "A wide angle photograph taken with a 23mm lens of a serene forest at sunrise with golden sunlight streaming through the trees, vibrant green foiliage and a soft morning mist highlighting the volumetric lighting."
Now we add additional description and mood information, highlighting the serenity, the colours, the fact that the light streams through trees and we highlight volumetric lighting to try and guide the image into adding depth by highlighting the interaction between light and mist.


Getting more interesting but it's feeling quite open, I was picturing something a bit closer. Lets add more details and maybe tweak the lighting.
4: "A wide angle photograph taken with a 23mm lens of a serene forest wilderness at sunrise with golden sunlight streaming through the thick canopy leaving dappled shadows interspersed with light. The forest is thick with vibrant green foliage, shrubs and ground cover and a soft morning mist highlighting volumetric lighting."
We add a few specific terms, like wilderness, and we add details such as the "thick canopy", "forest is thick" and mention shrubs and ground cover. This will hopefully bring in more plant life and give the forest a more closed in feel rather than the open strands of trees we've been getting so far.


I'm starting to really like what we're getting now but it needs some life in it. Lets see what happens if we add some friends.
5: "A wide angle photograph taken with a 23mm lens of a serene forest wilderness at sunrise with golden sunlight streaming through the thick canopy leaving dappled shadows interspersed with light. The forest is thick with vibrant green foliage, shrubs and ground cover and a soft morning mist highlighting volumetric lighting. A small blue-jay sings her welcome to the morning from the branches of a tree while a raccoon searches the ground around the bottom of the tree for breakfast."


Actually, I liked it better without the animals for once. For the final photo I think I'll pick one from the previous run.
Here we are, but not necessarily at the end of our journey. From here we could keep going, inpaint some more specific detail into the picture perhaps, or use outpainting to resize it and expand the scene outwards. We could run it through a resizer workflow and scale it up to work as a desktop wallpaper. Or we can move on to another example. Lets do that.
Example 2: Castles in the Air
1: "An impressionist oil painting of a majestic fantasy castle in the style of Alfred Sisley."
You'll notice this time we start with a bit more detail. We went slow in the previous example to show step by step how we compose the prompts, however as you get more experienced and this methodology becomes second nature you'll find yourself taking multiple steps at a time, or even writing out entire prompts in a single shot. The iterative method means that you can always remove elements that don't work and make changes so there's no need not to experiment as you like. For clarity of example however, we won't make too big a jump at a time here.


Nice start, now lets add some detail.
2: "An impressionist oil painting of a majestic fantasy castle in the style of Alfred Sisley. It is twilight as night begins to fall and a thick mist gathers around the base of the castle giving the scene a moody, mysterious feel. Burning torches have been placed by the entrances to the castle to hold back the dark."


Now we're talking, far more interesting. Some people have shown up too, looks like the model thinks there should be people around when things get dark and mysterious.
For the next jump, we're going to try something different. It's possible to layer styles on top of each other in order to achieve something more complicated. Once things get complicated you raise the difficulty of getting a generation you like so be ready to start running multiple iterations (or doing manually editing.)
We'll also add some text as well. Different models handle this better or worse - for instance with SD1.5 or SDXL it's better not to even try, however Flux can sometimes generate typography quite well if you're prepared to run a number of regenerations or perhaps some inpainting repair.
Let's give it a try and see how we go.
3: "A vintage postcard with faded colours and an old-fashioned border, featuring an impressionist oil painting of a majectic fantasy castle in the style of Alfred Sisley. It is twilight as night begins to fall and a thick mist gathers around the base of the castle giving the scene a moody, mysterious feel. Burning torches have been placed by the entrances to the castle to hold back the dark. At the bottom include the text "Greetings from Transylvania" in an elegant cursive font."


Further Exploration
So, where to next? Well, the first thing to do is get practicing! There's no substitute for experience. The next best thing is to start exploring the community. The AI Art community is a welcoming and friendly place and you can find us on just about any of the social media sites sharing and enjoying art. Search for #AIArt on X, Bluesky, Instagram, and likely other sites too. Everywhere images are shared, generative art fans are swapping images.
Bluesky is an excellent place to find like minded art fans. I recommend #PromptShare where members of the community share not only art but the prompts used to generate them. It's not uncommon to see multiple versions of the same image in a chain if a prompt catches someone's interest and it's a great way to get a look at examples of prompts in different styles.
We'll finish here with a list of prompt elements to try out. This is in no way exhaustive, just a place to start and hopefully kick off some explorations. We look forward to seeing your art!
Prompt elements to try
Techniques (e.g, "A Watercolour painting of....")
- Stencil, Watercolor, Papercraft, Ink Wash, Oil Painting, Graphite Sketch, Mosaic
Materials (e.g. ".... made out of porcelain")
- Porcelain, Light, Candy, Plastic, Wood, Glass, Sand, Rain
Photography Style (An extreme close up photograph of ....)
- Low Angle/High Angle, Extreme close up, Low shutter speed, Long exposure
Lighting
- Natural lighting, Light and shadow, golden hour, god rays, moonlight, chiaroscuro
About Us
The High-Tech Creative
Your guide to AI's creative revolution and enduring artistic traditions
Publisher & Editor-in-chief: Nick Bronson
Fashion Correspondent: Trixie Bronson
AI Contributing Editor and Poetess-in-residence: Amy
If you have enjoyed our work here at The High-Tech Creative and have found it useful, please consider supporting us by sharing our publication with your friends, or click below to donate and become one of the patrons keeping us going.
Thanks for this! It was quite helpful, and I'm saving it for future knowledge. I'm quite crap at generating art with diffusion models and would like to improve. Though finding a model that will actually render words correctly would be nice... I may try flux.